- Adding Widgets
- Display a Widget as Disabled
- Selecting Multiple Widgets
- Copy-Pasting Widgets
- Grouping / Ungrouping Widgets
- Changing Z-order: Send to Back / Bring to Front
- Distribute Widgets Evenly
- Aligning Widgets to Each Other
- Resizing Widgets to Same Width or Hight
- Fit Widget Size to the Text it Contains
- Checking and Setting Widget Geometry
- Locking Widget Geometry
- Transforming a Widget to Another Type
Adding Widgets *
To add a widget:
- Find its icon on a left toolbar.
- Drag it onto the screen:

Display a Widget as Disabled *
Most of the widgets can be displayed as “disabled”, exact look depending on the skin:
- Select a widget.
- Tick the “Disabled” checkbox on the property panel:

Note:
- You can also right-click a widget and choose “Enable/Disable” command from a menu (it switches the current state into its opposite).
Selecting Multiple Widgets *
To select multiple widgets, you can:
- Shift+click a widget to add it to selection.
- Drag mouse to select the widgets within a selection rectangle:

Copy-Pasting Widgets *
You can copy-paste a widget by selecting it and:
- Using cut / copy / paste commands from the “Edit” main menu.
- Using standard keyboard shortcuts.
- Right-clicking and using the appropriate command:

In the same way, you can:
- Copy-paste grouped widgets.
- Copy-paste multiple selected widgets.
- Copy-paste widgets between projects.
Grouping / Ungrouping Widgets *
Grouped widgets behave as a single widget. It’s handy for groups of widgets that are often used in exactly the same way (e.g., widgets that make a header for a web-page).
To make a group of widgets:
- Select multiple widgets.
- Right-click on them and choose “Group Widgets” option:

Changing Z-order: Send to Back / Bring to Front *
Order the way widgets overlap:
- Right-click on a widget.
- Choose either “Send to back” or “Bring to front”:

Distribute Widgets Evenly *
You can distribute multiple widgets both horizontally or vertically, i.e. space them evenly, from the Align command menu:
- Select multiple widgets.
- From top toolbar, open Align dropdown menu.
- Choose whether to distribute widgets horizontally or vertically.
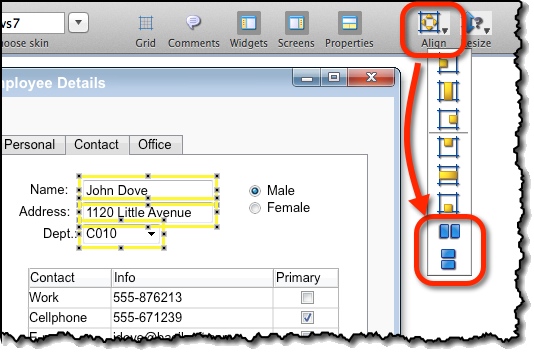
Aligning Widgets to Each Other *
You can select multiple widgets and make them aligned respective to each other via right-click “Align” submenu:
- Horizontally: left, right, centered.
- Vertically: top, middle, bottom.

Resizing Widgets to Same Width or Hight *
To make the widgets be of the same width or height:
- Select the widgets.
- Right-click on them and choose the command you need from the “Resize” submenu:

Fit Widget Size to the Text it Contains *
Select the widget, and choose “Fit to Text” option from the “Geometry” tab on the property panel:

Checking and Setting Widget Geometry *
When you need to position a widget precisely and explicitly set its size:
- Select the widget.
- Set its position and size on “Geometry” tab on property panel.
- Confirm the changes by clicking the “Change Geometry” button.

Locking Widget Geometry *
With dozens of widgets on a screen, it becomes troublesome to handle them with the mouse. Locking some of them in place helps to make it easier:

Transforming a Widget to Another Type *
Sometimes, you change your mind when deciding on widget types (for example decide that something is a dropdown, rather than a simple text-field).
You can change widget types without losing the data you entered:
- Right-click on a widget.
- Choose a transformation from the “Transform” submenu:
